
There are many problems that can arise with our footwear. Especially work boots, due to their rigorous use and exposure to elements. Sole delamination is one of the main problems.
In this article, we’ll be explaining what delamination is, particularly in the soles of footwear. We’ll also explain potential causes, and what you can do to rectify it.
/toc
Who’s working on this page

Jimmy Webb
Author & Researcher

Victor Adrian
Researcher & Editor
What is delamination?
The simplest way to describe delamination is that it is where two surfaces that are glued together come apart. In relation to the topic of this article, it’s where the sole of the work boot separates from the upper.
But it goes deeper than that…
It’s also where the elements of a single material break down, causing that material to fracture into layers. For example, layers from rolled steel, plastics, metals from 3D printing, etc can fail from separation.
You’ll see forms of delamination everywhere without realizing it. Like in the house or garden.
That paint that’s been peeling away from your garage walls or workshop doors and frames over the years, for instance.
What is sole delamination?
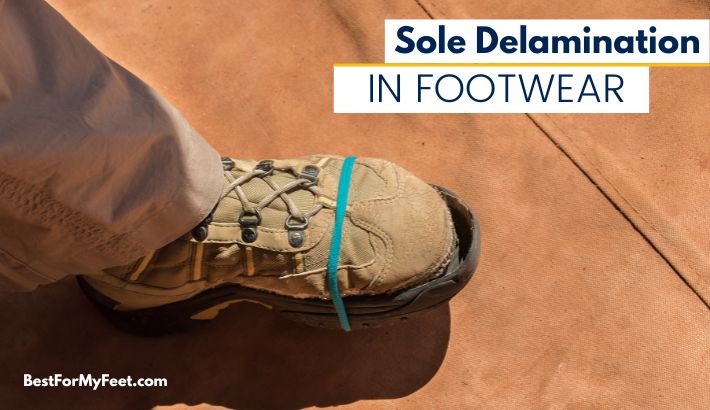
The rubber sole of a boot is attached to the upper by many methods, often using a combination of stitching, Goodyear welting, and gluing (cemented construction).
Sole delamination is where the rubber sole of the boot starts to separate from the upper.
It’s usually only part separation in certain areas, as opposed to rare instances of the whole sole becoming detached. The main problem areas are the ones that take the most stress. At the heel and toe areas.
The stitching can deteriorate and the glue can break down, reducing the bonding.
What causes sole delamination?
Wear and tear is a big factor. Nothing lasts forever after constant use.
Delamination is most critical under compressive stress. Either by direct compressive loading (ie our bodyweight) or by induced bending and flexing (walking, crouching, etc).
The environment you’re working in also has a large factor, as well as the materials you work with. For instance, you might not think it, but water has a habit of corroding things over time.
It’s the main cause of rusting of metals, and can even wear concrete and tarmac down if left sitting on it for long periods. Think of those nasty pot-holes in the roads.
Workplace chemicals can also deteriorate the bonding. Cements, acids, cleaning agents, oils etc. This is why it’s very important to choose oil-and-chemical-resistant boots if you know you’ll come into contact with these substances.
Fire and heat have a huge impact, not only on the bonding but on the rubber and leather as well. Certain jobs will require heat-resistant boots, like oil-rigging and tarmacking.
But occupations like firefighting require NFPA-approved work boots. This means they have to pass rigorous testing to withstand the high demands of the job. The heat from this job will most definitely melt low-quality soles and break them down.
There are many tests. To name a couple: Cut resistance, and liquid penetration resistance.
But the tests related to factors that could cause delamination are:
Tests related to factors that could cause delamination
1. Conductive Heat Resistance (Test 1)
Temperature of the upper lining surface in contact with the skin shall have a 2nd-degree burn time of not less than 10 seconds and shall have a pain time of not less than 6 seconds.
2. Conductive Heat Resistance (Test 2)
After 20 minutes on 260°C (500°F) plate, the insole surface in contact with the foot shall not exceed 44°C (111°F).
3. Heat and Thermal Shrinkage Resistance Test
Shall not have any part melt, separate, ignite, or show water penetration and all components shall remain functional.
4. Corrosion Resistance Test
Shall not show more than light surface-type corrosion or oxidation and shall remain functional.
5. Thread Melting Test
Shall not melt at or below 260°C (500°F).
6. Flame Resistance
Shall not have an afterflame of more than 5 seconds. Shall not melt or drip or exhibit any burn-through.
How to repair delaminated boots
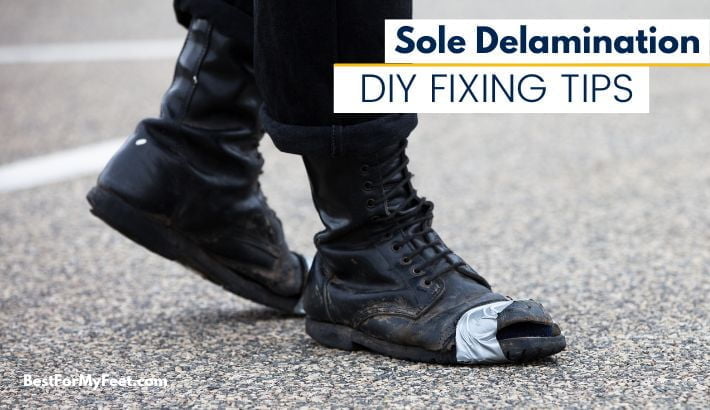
The best and most reliable thing to do would be to use a professional. They do this sort of thing every day, and know the right bonding to use for each specific job requirement.
You get the advantage of skills passed down through generations. Plus, it’s a good way of supporting local businesses. However, this comes at a cost.
If you don’t want to part with your hard-earned money, there are ways of doing the repairs yourself. This wouldn’t be suitable if you do work in high-risk sectors, like oil rigs and firefighting, because the repairs wouldn’t last and your feet would likely be in danger from the heat.
And this method probably won’t give your boots a long life if you do rigorous work, like groundbreaking, landscaping, logging, farming, etc. But for the amount it would cost, and the amount of glue you would get in the tube, you could probably afford to repeat the process.
Materials
- You don’t need many materials at all.
- A suitable glue
- Small matchsticks, or something similar
- A clean cloth
- Masking tape
Step-by-step repair process
Check around the whole of the rubber to find any separation, and clean the bulk of any dirt off.
Now you need to prep the surfaces between the areas that have come apart.
Scrape out any dirt with the matchsticks and thoroughly clean the areas. This is very important, otherwise, the glue will stick to the dirt instead of the boot materials.
Place strips of masking tape on the areas that you don’t want glue on.
This isn’t overly important but is highly advisable. It’s like cutting in when painting at home. You want to make a nice job of it without slapping the stuff everywhere.
Now carefully apply the glue.
By carefully, I mean DO NOT STICK YOUR FINGERS TOGETHER, and watch for surplus glue. It can be surprising how much and how quickly it can come out.
Use the matchsticks (or any other thin objects) to spread the glue evenly into all
the cracks on both surfaces that need bonding.
Before you clamp the surfaces together, you’ll need to check the glue instructions.
Some glues will allow for instant adhesion, but others require that you wait for the glue to dry to a tacky stage before applying pressure.
Firmly and precisely hold the rubber onto the boot.
It may be advisable to use a hand or hard object inside the boot to give something to push against. The harder you hold the better. Strength is more important than the length of time.
Once you’ve pressed it into position, be sure not to jiggle or move the two surfaces around, because this will deter the bonding process.
Be sure to remove the masking tape as soon as you’ve pressed the surfaces together, not after leaving them clamped for a while, otherwise the tape will also get stuck and be very difficult to remove.
It would be advisable to leave the glue to fully cure before wearing the boots. Some glues might not require this, but as a precaution, it’s a good idea.
Last notes on sole delamination
I’m sure you’ve all had times when your shoes or boots have come away at the soles. I certainly have. Well, now you know what the term is for this, what the main causes are, and what you can do about it.
You don’t need to worry too much and think your boots are finished, game over, end of credits. You don’t necessarily need to throw the boots away. We live in a throw-away society these days.
Most things are repairable either by ourselves or by professionals. Why not get the satisfaction of saving some cash by fixing the boots yourself with your own bare hands?
Or why not support local businesses by using the skills and knowledge of a professional? You’d likely even get advice from them.
Remember that the chances of sole delamination can be affected by the level of boot that you wear.
Cheaper work boots for example will likely come apart sooner because the glues are less effective.
They may not have stitching or Goodyear welting, and if they do, it might not be applied very suitably, and they might not be resistant to the elements that could cause the delamination. Like heat, cold, oils, and chemicals.
Choose your boots wisely in relation to what work you do. Sometimes it is better to go for premium boots for that extra durability. You’ll also get a longer warranty.
That’s just about rounded that up. We hope you’ve found this informative and useful. Now put your dancing shoes on, and let’s go to the ball.
Team Members Working On This Page

Jimmy Webb – Writer And Researcher
Hey, Jimmy here. I’m one of the researchers and writers here at BestForMyFeet.com. I’ve been wearing work boots all my life working as a forklift driver, landscaper, groundworker, and now as a tower crane operator so I know a few things about footwear and footcare in general. I’m also working on my first novel. So writing IS my passion. When I’m not writing I love to spend time with my wife, two children, and furball.

Victor Adrian – Editor And Webmaster
Construction Professional, driver, crane operator, cleaner, head chef … these are just some of the jobs I did in the past. Working in all these different environments taught me that having good footwear to protect your feet from different dangers at work IS PARAMOUNT for any worker! On this website, I aim to share all my knowledge and personal experience in dealing with different footwear and foot care issues, and hopefully, you can get something out of it. Enjoy!